Table of Contents
What is stainless steel?
Stainless steels, as their name suggests, are a group of steel alloys with a shiny appearance and good corrosion resistance. The base element (70-80%) is Iron (Fe) with a minimum of 10.5% Chromium; most grades will have additional alloying elements such as nickel (Ni) and molybdenum (Mo).
Most stainless steel alloys are challenging to machine because of several reasons:
- They are very ductile, so it is hard to achieve reasonable chip control.
- The fast development of notch wear and built-up edge.
- High cutting forces and low heat conductivity can cause rapid work hardening.
make your life easier when machining Stainless Steel
Use Free Machining Stainless Steel Alloys
Adding to stainless steel Certain alloying elements, such as sulfur, selenium, lead, carbon, copper, aluminum, or phosphorus, can boost machinability. The enhancement is achieved by reducing the friction and ductility of the material. Several popular alloys have a Free Machining alternative that preserves the fundamental qualities of the original material while making it much easier to machine. The chart below shows the free-cut alternatives and how much they enhance machinability.
| Regular Stainless Steel Alloy | Free Machining Alternative | Machinability Boost |
|---|---|---|
| 410 | 416 | 64% |
| 420 | 420F | 22% |
| 430 | 430F | 20% |
| 304 | 303 | 53% |
- In addition to the increased cutting speed, also chip control is improved, leading to even higher productivity.
- The alloying elements that improve free-machining characteristics slightly affect corrosion resistance, ductility, and weldability. However, these differences are only critical in some cases and might be worth the increased productivity.
No matter if you are a job shop or a machining department in a factory. Contact the relevant engineer and check if he can allow using the Fee-Cut alternative.
Use High-Quality Material even if it costs more.
Two suppliers selling the same material (for example, Stainless 316) might have different qualities, which could affect your productivity. Most reputable stainless steel suppliers will stock two (or more) alloys for each SAE number. All these alloys comply with the standard and are legit. However each specific alloy will have enhanced qualities and probably a higher price point.
Raw material properties that will save you money:
- Runout & roundness of the bar – Runout and ovality of a bar make the first cut behave like an interrupted cut instead of a continuous cut. This will shorten the tool life in any material. When machining stainless steel, this factor is magnified because of two reasons:
- The best inserts for machining stainless steel have sharp cutting edges (see below). This makes them very sensitive to impacts. If you need to use a wider k-land to overcome the impacts, you will have poor performance after eliminating the outer layer with the runout.
- We have encountered enough difficulties machining this material already. It is wiser to get out of the way factors that we can avoid.
- Scale thickness – The existence of scale, its thickness, and uniformity will have an effect similar to a significant runout. (See above). You might save a lot of money, although you will pay more for a well-peeled material without scale.
- Chemical uniformity – Each alloy is manufactured according to a standard that dictates its chemical composition. Each element has a permissible range. The exact chemical composition of the alloy affects (sometimes significantly) the chip behavior and the optimal cutting speed. If the composition varies more between material batches (Or between bars within one batch), your tool life and chip control will be inconsistent. A reputable material supplier will usually control the composition more tightly.
- Chip behavior – Chip control is sensitive to minor material properties changes. If you are not achieving decent chip control, consider checking out another vendor or opt for a higher-quality alloy from the same supplier.
A higher quality material usually costs more but will save much more in productivity and cutting tool costs.
Lubrication and Cooling
High heat is generated when machining stainless steel because:
- The low thermal conductivity of the austenitic stainless steel restricts the heat flow away from the machined faces.
- The considerable depth of cuts and high feed rates needed to reduce the risk of work hardening (see below) increase the amount of heat generated.
Therefore, the best practice is as follows:
- Use high cutting fluid flow rates.
- Opt for mineral oils for operations with heavy loads at low cutting speeds and when using HSS tools. If excessive wear is experienced, consider increasing the dilutions. If the cutting edge tends to burn, consider reducing the dilution.
- Opt for emulsions when cutting with carbide at high cutting speeds.
- Use a high-pressure coolant in the range of 600-1500 PSI (40 -100 Bar). Using coolant in this pressure range Vs. the default pressure supplied by most machine manufacturers can dramatically improve chip control and significantly increase cutting speeds.
Work Hardening
All 300 series alloys have a certain degree of work hardening. Stainless steel 316 is especially sensitive in this respect. The best practices to reduce it are:
- A larger depth of cut and a high feed rate reduce work hardening risk.
- Opt for sharp cutting edges and replace tools on time before they show significant wear.
Turning Stainless Steel
When turning stainless steel, the first two questions that pop up are what cutting speed and carbide grade should I use? Get a quick answer using our two calculators below.
Recommended carbide grades
Recommended Cutting Speeds
The above mini-calculators provide a quick answer for general conditions. Use our advanced tools to get more accurate results based on dozens of parameters.
Machining strategy
Notch Wear and Build Up Edge are the two most common problems that decrease productivity and tool-life when machining stainless steel. We will see what they are and how we can avoid them. However, as you will see, the remedy for one is often the enemy of the other. Therefore, finding the sweet spot in between is a game of balance.
Notch Wear

Notch wear (Nicknamed Vg) is a wear mechanism that forms on the flank and rake of a turning insert cutting edge at the “Depth of Cut Line” (See picture). It is caused by temperature, chemical, and environmental differences between the section that contacts the raw material and the area just above it.
The best way to prevent notch wear from forming is to change the depth of the cut constantly. For example, ramping down at a slight angle turning in one direction, and then turning back. However, in many cases, this is not possible. In such situations, you can:
- Reduce the cutting speed.
- Opt for a stronger cutting edge geometry with a larger honing and/or a smaller rake angle.
You need to be careful with the above two solutions since they have a negative impact on the build-up edge (see below).
Build Up Edge
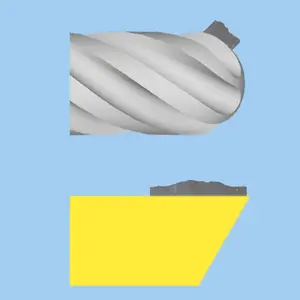
Built-Up Edge (Nicknamed BUE) is a wear mechanism caused by the welding of chips to the insert. It appears when the temperature in the cutting zone is too low and therefore is associated with slow cutting speeds.
The failure due to the Built-Up edge usually happens when the welded chip breaks and, consequently, tears with it a small amount of carbide, creating a pit on the cutting edge.
You can avoid BUE by:
- Increasing the cutting speed (To increase the temperature).
- Opt for a sharper cutting edge geometry with a smaller honing size and a smaller rake angle.
You need to be careful with the above two solutions since they have a negative impact on the notch wear (see above).
Milling Stainless Steel
When turning stainless steel, the first two questions that pop up are what cutting speed and chip load should I use? Get a quick answer using our two calculators below.
Recommended Chip load
Recommended Cutting Speeds
The above mini-calculators provide a quick answer for general conditions. Use our advanced tools to get more accurate results based on dozens of parameters.
Choice of Tools
Choosing the correct tool configuration for your application is vital when machining stainless steel. Roughing, finishing, and high-speed machining can be optimized for stainless steel by selecting the most suitable flute count and helix angles.
Roughing
A 4-5 flute end mill with 30°-40° is the first choice for roughing. Five-flute end mills will allow for higher feed rates, while a four-flute cutter will enable better chip evacuation.
Finishing
Opt for a higher flute count and an increased helix angle when finishing a stainless steel part. Finishing end mills for stainless steel will have a helix angle of over 40° and a flute count of 5-7. When finishing with a small radial depth of cut, the flute count can be as high as 7-14.
High-Speed Machining (HSM)
When milling an HSM tool path, the goal is to run extremely fast at a shallow depth of cuts, thus taking advantage of the Chip Thinning effect. Opt for a milling cutter with the maximum number of flutes.
