Table of Contents
Surface Finish Calculator
Calculate the Turning surface finish based on corner radius and feedrate
FeedRate Calculator
Calculate the FeedRate that yields the required Surface Finish
Surface Finish Formulas (Turning)

Theory
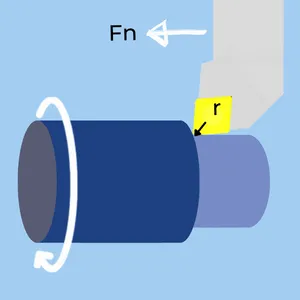
The surface roughness of the turning operation depends on the feedrate and the insert corner radius. A lower feedrate, as does a larger corner radius, improves the surface finish.
Tip – The feedrate is squared in the formula and therefore has a more significant influence. When you need to improve the surface quality, start by reducing the feedrate
\( \normalsize \text {(K is a constant that depends on the units used)} \)
Tip –This formula provides the best theoretical surface finish at optimal conditions. The actual surface quality depends on additional factors such as stability and cutting-edge wear.
The formula in metric units
- Fn – Feed rate [mm/rev]
- r – Corner Radius[ mm]
- Ra – Surface Finish [μ]
The formula in Imperial units
- Fn – Feed rate [IPR]
- r – Corner Radius [Inch]
- Ra – Surface Finish [μ Inches]
Surface finish conversion chart
| Ra [Micrometers] |
Ra [Micro Inches] |
RMS | CLA | N (ISO) |
|---|---|---|---|---|
| 0.025 | 1 | 1.1 | 1 | 1 |
| 0.05 | 2 | 2.2 | 2 | 2 |
| 0.1 | 4 | 4.4 | 4 | 3 |
| 0.2 | 8 | 8.8 | 8 | 4 |
| 0.4 | 16 | 17.6 | 16 | 5 |
| 0.8 | 32 | 32.5 | 32 | 6 |
| 1.6 | 63 | 64.3 | 63 | 7 |
| 3.2 | 125 | 137.5 | 125 | 8 |
| 6.3 | 250 | 275 | 250 | 9 |
| 12.5 | 500 | 550 | 500 | 10 |
| 25 | 1000 | 1100 | 1000 | 11 |
| 50 | 2000 | 2200 | 2000 | 12 |
What is Surface Finish

Surface finish (Also sometimes called surface roughness) is a numeric representation of a surface’s “smoothness”. There are 3 main ways to acquire the surface roughness value:
- Mechanical Scan: The most common method is to scan the surface with a needle that records the micro “Hills ” and “valleys” along a linear section. The measurement process produces a chart analyzed by a mathematical formula to yield a surface finish value.
- Visual Comparison: An old traditional way that is rarely used today. It visually compares (With a human eye) the surface against a standard pallet of different surface qualities.
- Visual Computerised Scan: A high-definition digital camera connected to a computer performs an optical scan and calculates the surface finish.
Surface Finish units dictionary

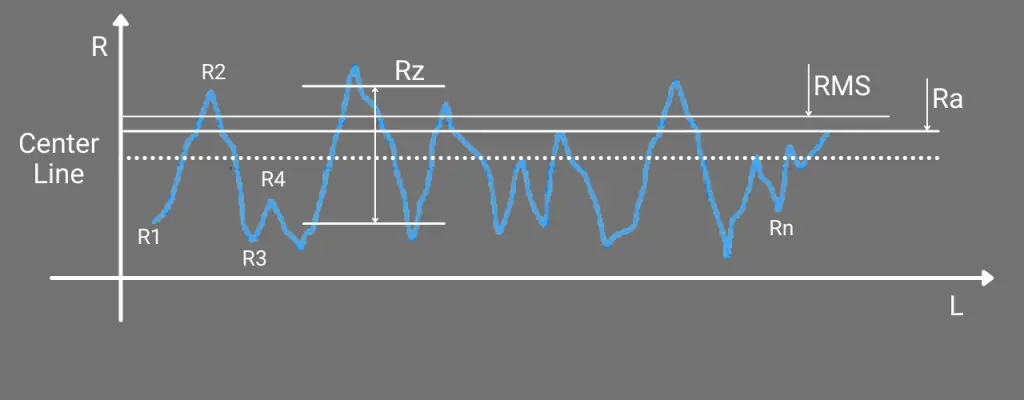
It does not matter which scanning method was used. In the end, a chart, as shown above, has to be analyzed and yield a single number that represents the surface finish. Unfortunately, there are several different units of measurement in use, and it can get confusing. Below, we will discuss the typical surface roughness units in use in the machining world.
Ra – Roughness Average
Ra is the most commonly used unit. According to ASME B46.1, Ra is the arithmetic average of the absolute values of the profile height deviations from the centerline, recorded within the evaluation length.
- Ra – Surface finish value in Micrometers/Micro-inches
- R1, R2, …Rn – Peaks along the scanned surface.
- n- Number of peaks along the scanned surface
- Cl – Average profile height
- Ra – Surface finish value in Micrometers/Micro-inches
- R1, R2, …Rn – Peaks along the scanned surface.
- n- Number of peaks along the scanned surface
- Cl – Average profile height
Rz – Peak to Valley Average
Rz is the second most commonly used unit. Rz is calculated by measuring the vertical distance from the highest peak to the lowest valley within the scanned profile. The highest five peaks and the five deepest valleys are taken, then averaging these distances. Rz will always yield a higher value than Ra. People make the common mistake of asking, “How to convert from Ra to Rz?”. It is not possible since these are two different physical properties. It is like asking how I convert height to weight. (Learn More about Ra/Rz conversions here)
- Rz – Surface finish value in Micrometers/Micro-inches
- Rp1, Rp2, …Rpn – Peaks along the scanned surface.
- Rp1, Rp2, …Rpn – Valleys along the scanned surface.
- n- Number of peaks/Valleys along the scanned surface
- Rz – Surface finish value in Micrometers/Micro-inches
- Rp1, Rp2, …Rpn – Peaks along the scanned surface.
- Rp1, Rp2, …Rpn – Valleys along the scanned surface.
- n- Number of peaks/Valleys along the scanned surface
N – Numbers (N4, N5, …)
Another common unit in use is the “N” number. This series of arbitrary numbers from 1 to 12 (N1, N2, …N12) is defined in ISO 1302. Each number corresponds to a Ra value. Pay attention that the scale is logarithmic. Hence the difference between N8 and N7 is much more significant than between N7 and N6.
N Vs Ra
(Complete Range)
N Vs Ra
(Range Relevant for Machining)
Additional Surface Finish Measuring Units
- RMS – “Root Mean Square”. Root mean square average of the profile height deviations from the mean line. Like Ra, but instead of absolute value, the square of Ri is used to normalize the sign. Yields about 10% above Ra. This unit is seldom used.
- CLA – “Center Line Average”. Equals to Ra in micro-inches and rarely used.
- Triangles – An older ISO system before the N numbers scale. (Can appear on very old drawings)
Surface finish Chart by Machining Technology
In the chart below, you can find the lowest surface roughness (best surface finish) that the main machining processes can achieve.
Ra/Rz Conversions
A common question among machinists and engineers is, “How to convert from Ra to Rz?”. A precise conversion like one can make between Kw and HP is impossible since Ra and Rz are two different properties.
It is like asking, “How do I convert height to weight?”. You cannot convert. However, you can make a rough estimation based on statistics. A person with a height of 6 feet will weigh between 140 and 290 pounds (At a probability of 99%). We know he will not weigh 100 pounds, nor 400.
The same logic is applied when converting Ra to Rz (or Rz to Ra). Based on statistics, we can forecast the Rz range for a specific Ra with reasonable probability.
Use the below calculator and charts, or get a deeper explanation here.
Ra / Rz Conversion Calculator
Ra / Rz Conversion Charts
Ra to Rz Metric
| Ra [µm] | Rz Range [µm] |
|---|---|
| 0.1 | 0.4 - 2.5 |
| 0.2 | 0.8 - 4 |
| 0.5 | 2 - 9 |
| 1 | 4 - 14 |
| 1.5 | 6 - 20 |
| 2 | 7 - 25 |
| 3 | 11 - 33 |
| 5 | 17 - 49 |
| 10 | 34 - 84 |
| 15 | 50 - 115 |
| 20 | 65 - 140 |
Ra to Rz Inch
| Ra [µ Inch] | Rz Range [µ Inch] |
|---|---|
| 4 | 16 - 100 |
| 8 | 32 - 160 |
| 20 | 80 - 360 |
| 40 | 160 - 560 |
| 60 | 240 - 800 |
| 80 | 280 - 1000 |
| 120 | 440 - 1320 |
| 200 | 680 - 1960 |
| 400 | 1360 - 3360 |
| 600 | 2000 - 4600 |
| 800 | 2600 - 5600 |
Rz to Ra Metric
| Rz [µm] | Ra Range [µm] |
|---|---|
| 1 | 0.03 - 0.2 |
| 5 | 0.3 - 1.3 |
| 10 | 0.6 - 3 |
| 20 | 1.5 - 6 |
| 50 | 5 - 15 |
| 100 | 13 - 32 |
| 150 | 21 - 49 |
Rz to Ra Inch
| Rz [µ Inch] | Ra Range [µ Inch] |
|---|---|
| 40 | 1 - 8 |
| 200 | 12 - 52 |
| 400 | 24 - 120 |
| 800 | 60 - 240 |
| 2000 | 200 - 600 |
| 4000 | 520 - 1280 |
| 6000 | 840 - 1960 |


